The Starry Ridge Mini Bag - Free Crochet Pattern
- Jacqueline Visser

- Feb 7
- 6 min read
Updated: Mar 1
This post may contain affiliate links. This means that if you click on a link and make a purchase, I may earn a small commission at no extra cost to you. I only recommend products and tools that I personally use, love, or truly believe will be helpful. Thank you for supporting my work!
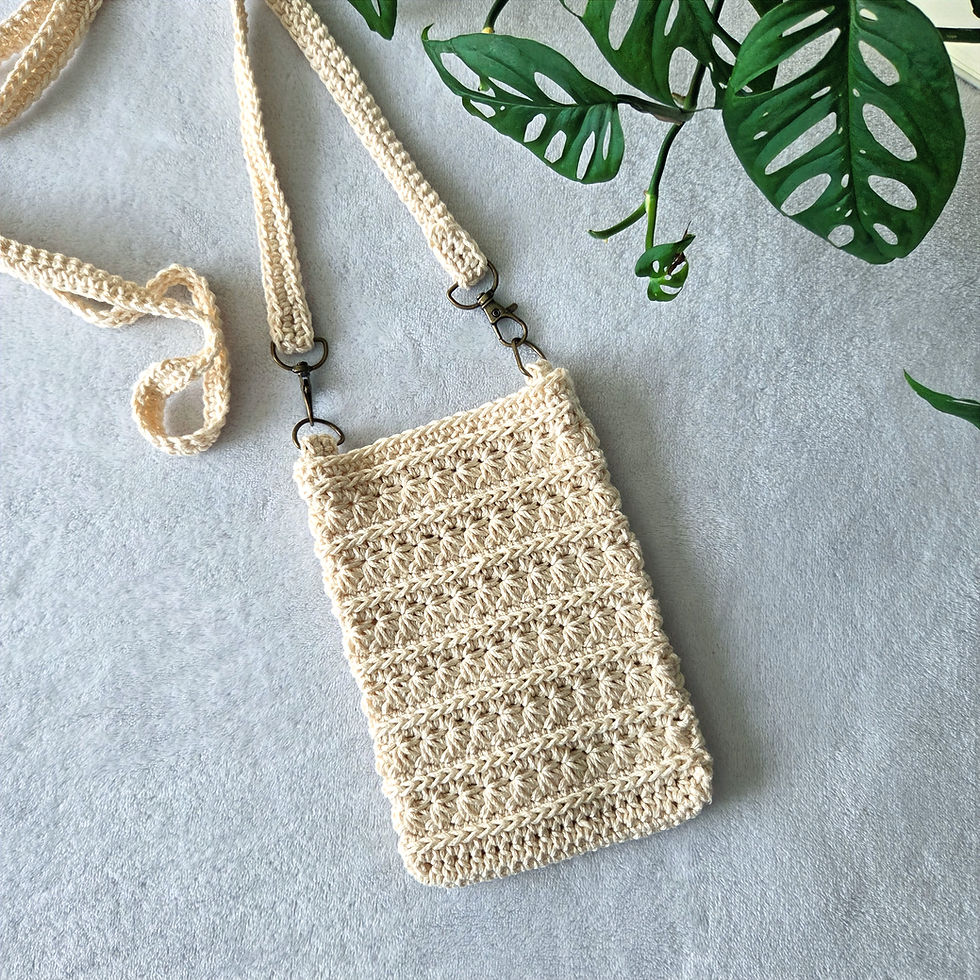
Some bags are made to carry everything—and others are made to carry just what you need. The Starry Ridge Mini Bag was designed for light days and simple outings, with a compact size that keeps your essentials close without weighing you down. Featuring the signature textured stitch pattern and a softly structured shape, this mini bag blends practicality with handmade charm.
Inspired by the cozy textures and quiet beauty of the Starry Ridge collection, this mini bag is perfect for quick errands, market strolls, or casual days when less is more. It’s a satisfying, approachable project that works up beautifully and finishes as a piece you’ll reach for again and again.
In this post, I’ll walk you through everything you need to get started—materials, helpful tips, and of course, the full pattern. Grab your hook, get your yarn, and let’s make something beautiful together.
Pattern Details:
- Finished Size:
Height: 7” (18 cm)
Width: 5” (13 cm)
- Skill Level: Intermediate
- Stitches Used for the bag: Star Stitch, Single Crochet, Slip Stitch, Chain, Half Double Crochet, Single Crochet 3rd loop
- Stitches used for the strap: Chain and single Crochet
Get the PDF pattern
If you prefer a clean, easy-to-print version of this pattern, you can grab the PDF in my shops! The PDF includes a beautifully formatted layout, step-by-step instructions, and is perfect for crocheting on the go. Use promo code SAVE15 at checkout for15% off your purchase

Copyright © 2026 Jackie Visser. For personal use only. Commercial use or redistribution is prohibited.
The Yarn
This market bag is worked using Lion Brand 24/7 Cotton Yarn
Fiber content: 100% cotton
Weight: Worsted / #4
Yardage: Approximately 125 yd (114 m) per 50 g skein
Care instructions: Machine washable and dryable
.
Materials
Hook: Prym Crochet Hook G/ 4mm
Yarn: 1 skein of Lionbrands 24/7 Cotton yarn
Hardware: 2 1" D ring Clasps and 2 1" D Rings
Abbreviations:
ST - Stitch
Ch - Chain
SL ST- Slip Stitch
SC - Single Crochet
HDC - Half Double Crochet
SC 3rd loop- Single Crochet 3rd loop
Star ST- Star Stitch
Special Stitches:
The Star Stitch
Step One: Ch 3, in the second CH from the hook insert your hook and draw up a loop (2 loops on the hook) in the next ST, insert your hook and draw up a loop. (3 loops on the hook) In the next ST, insert your hook and draw up a loop. (4 loops on the hook) in the next available ST insert hook and draw up a look (5 loops on the hook) in the next available ST insert hook and draw up a loop (6 loops on the hook) YO and draw through all 6 loops. CH 1 to close the ST.


Step 2: In the CH space of the Star ST just completed, insert hook and draw up a loop (2 loops on the hook) in the side of the previous Star ST insert hook and draw up a loop (3 loops on the hook) in the ST at the base of your previous Star ST insert hook and draw up a loop (4 loops on the hook) in the next ST insert hook and draw up a loop. (5 loops on the hook) in the next ST insert hook and draw up a loop (6 loops on the hook) YO and draw through all 6 loops, CH 1 to close the ST.


Bag Instructions
Round 1: CH 21. SC in each ST across until you have 1 ST remaining. In the last ST work 3 SC, working the other side of the beginning CH, 1 SC in each ST across until you have one ST remaining. In the last ST work 2 SC, SL ST to the top of the first ST of the round. 42 SC
Tip: Place a stitch marker in the very last ST to help identify the last ST of the round.
Round 2: CH 1. 1 HDC next 20 STs. 3 HDC in the next ST. 1 SC in the next 20 STs. 3 SC in the last ST of the round. 46 HDC
Round 3:CH 1. HDC each ST around. 46 HDC
Round 4: CH 1, SC in the 3rd loop each ST around. Join with SL ST to the first SC. 46, SC
Round 5: CH 3 Star ST all the way around. Join with a SL ST to the top of the first Star ST. 23 Star ST
Round 6: CH 1, 1 HDC in the top of the first Star ST, 1 HDC in the CH- 1 SP repeat all the way around. SL ST to the first HDC. 46, HDC
Round 7: CH 1, 1 SC in the 3rd loop of each ST all the way around. Join with a SL ST to the first SC. 46, SC
Round 8: CH 3 and work Star ST all the way around. Join with a SL ST to the top of the first Star ST. 23 Star ST
Round 9: CH 1, 1 HDC in the top of the first Star ST, 1 HDC in the CH- 1 SP repeat all the way around. SL ST to the first HDC. 46, HDC
Round 10: CH 1, 1 SC in the 3rd loop of each ST all the way around. Join with a SL ST to the first SC. 46, SC
Round 11: CH 3 and work Star ST all the way around. Join with a SL ST to the top of the first Star ST. 23 Star ST
Round 12: CH 1, 1 HDC in the top of the first Star ST, 1 HDC in the CH- 1 SP repeat all the way around. SL ST to the first HDC. 46, HDC
Round 13: CH 1, 1 SC in the 3rd loop of each ST all the way around. Join with a SL ST to the first SC. 46, SC
Round 14: CH 3 and work Star ST all the way around. Join with a SL ST to the top of the first Star ST. 23 Star ST
Round 15: CH 1, 1 HDC in the top of the first Star ST, 1 HDC in the CH- 1 SP repeat all the way around. SL ST to the first HDC. 46, HDC
Round 16: CH 1, 1 SC in the 3rd loop of each ST all the way around. Join with a SL ST to the first SC. 46, SC
Round 17: CH 3 and work Star ST all the way around. Join with a SL ST to the top of the first Star ST. 23 Star ST
Round 18: CH 1, 1 HDC in the top of the first Star ST, 1 HDC in the CH- 1 SP repeat all the way around. SL ST to the first HDC. 46, HDC
Round 19: CH 1, 1 SC in the 3rd loop of each ST all the way around. Join with a SL ST to the first SC. 46, SC
Round 20: CH 3 and work Star ST all the way around. Join with a SL ST to the top of the first Star ST. 23 Star ST
Round 21: CH 1, 1 HDC in the top of the first Star ST, 1 HDC in the CH- 1 SP repeat all the way around. SL ST to the first HDC. 46, HDC
Round 22: CH 1, 1 SC in the 3rd loop of each ST all the way around. Join with a SL ST to the first SC. 46, SC
Round 23: CH 1. 1 SC in each ST all the way around. Join with a SL ST to the first SC. 46, SC.
CH 200
SC in each ST across until you have 1 ST remaining. In the last ST work 3 SC, working the other side of the beginning CH, 1 SC in each ST across until you have one ST remaining. In the last ST work 2 SC, SL ST to the top of the first ST of the round.
Attaching D Rings to the Strap
1) Place the D-ring with the clip on the strap
2) Fold about an inch of the strap
around the D-ring.
3) With a yarn tail of around 10" sew
the strap around the D-ring.


Repeat for the second D-ring.
Tab
Ch 10
SC in each ST across until you have 1 ST remaining. In the last ST work 3 SC, working the other side of the beginning CH, 1 SC in each ST across the until you have one ST remaining. In the last ST work 2 SC, SL ST to the top of the first ST of the round.
Attaching Tab to D-ring
1) Place the D-ring on the tab.
2) Fold the tab around the D-ring
3) With a yarn tail of around 10", sew
the tab around the D-ring


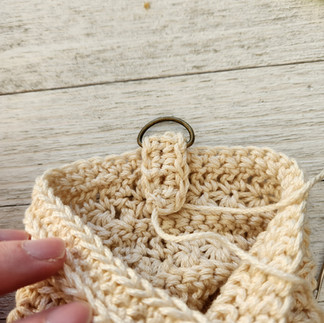
Repeat for the second tab.
I’d love to see your creations! Share your finished headbands with me on Instagram @jvcro_chet — seeing your projects brightens my day and inspires future designs.
If you loved this pattern, don’t forget to check out the matching Starry Ridge Cross Body Bag and the Starry Ridge Summer Headband!


© 2026 Jackie Visser. All rights reserved. Starry Ridge Headband pattern may be used for personal use only. Please do not redistribute or sell this pattern without permission. Tag me on instagram @jvcro_chet I'd love to see your finished work!


Comments